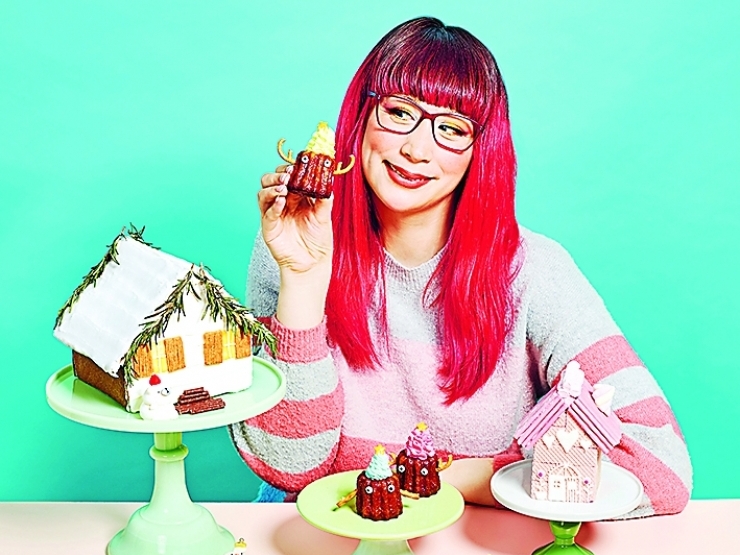
Kim-Joy is known for her cute culinary creations. Here are two of her Christmas recipes to try yourself.
Irish cream snowmen choux for Christmas
(Makes 18-24)
For the choux pastry:
85g unsalted butter
225ml water
Pinch of salt
50g plain flour
50g strong white flour (to make gluten free, swap both plain and strong white flour for 100g gluten-free flour plus ¼tsp xanthan gum)
2–3 medium eggs
For the Irish cream liqueur filling:
480ml double cream
4tbsp icing sugar
1tbsp Irish cream liqueur
For the vanilla icing:
200g icing sugar
40–50ml water
½tsp vanilla bean paste
For the royal icing:
20g egg white (substitute with aquafaba for a vegan version)
112g icing sugar
Plus extra egg white (or aquafaba) and icing sugar to adjust and get the right consistency
Plus:
Matchstick cookies or similar
Sprinkles
Orange and black food dyes (or more sprinkles)
Fondant, fruit, nuts, candy canes, etc for additional decoration (optional)
Method:
1. Preheat the oven to 200°C.
2. To make the choux pastry, chop the butter and add it to a small saucepan with the water and salt. Heat until the butter has melted and the mixture is starting to bubble. Meanwhile, combine both flours (or gluten-free flour plus xanthan gum) in a separate bowl. When the butter mixture is bubbling, remove it from the heat and add the flours all in one go. Stir with a wooden spoon until it forms a smooth ball that pulls away from the sides very easily – this is called a panada.
3. Transfer the panada to a stand mixer fitted with a paddle attachment (or use a handheld electric whisk) and leave to cool for five to 10 minutes.
4. Add two eggs, one at a time, to the panada, mixing on slow speed after each addition until combined. Whisk a third egg in a separate bowl and gradually add one tablespoon at a time, mixing well after each addition. You may not need to add the third egg, or you may need to add a little or all of it. It’s important to add it gradually to avoid having a batter that is too runny. You are looking for a glossy consistency, which leaves a ‘v’ when a spoon is lifted out of the dough.
5. Transfer to a piping bag and cut a medium tip. Line two baking sheets with baking paper or a silicone mat, then pipe 20 x 3cm circles onto one of the baking sheets.
6. Bake in the oven for 10 minutes, then turn the oven down to 180°C and bake for a further 20 minutes. Don’t open the oven until at least 25 minutes have passed, to avoid the choux pastry deflating.
7. Meanwhile, pipe a second batch onto the other baking sheet. This time you will need 20 x 2.5cm circles (there will be some leftover choux so you can pipe extra if you like).
8. When the first batch of choux have finished baking, immediately turn them over and use a knife to pierce the base. This is so that the air inside has somewhere to escape, and also gives you a place to pipe in the filling. Bake the second batch of choux for 10 minutes at 200°C, then a further 10 minutes at 180°C.
9. Meanwhile, make the Irish cream filling. Add all the ingredients to a clean, grease-free bowl and whip on medium-high speed until stiff enough to pipe and hold its shape. Don’t overwhip. Transfer the whipped cream to a piping bag and cut a small tip.
10. Pipe the cream into the cooled choux buns through the hole created earlier, making sure each one is filled completely.
11. To make the vanilla icing, whisk all the ingredients together in a bowl, then spoon the icing over the top of each choux bun. Stack the smaller choux bun on top of the larger one.
12. Decorate with Matchstick cookie arms and sprinkles for buttons. These will stick if you add them before the icing sets but use a little extra if needed.
13. For the facial features, making royal icing. Use a stand mixer (or handheld electric whisk) fitted with a balloon whisk attachment to combine the egg white/aquafaba and icing sugar until you get a smooth consistency. Then add tiny amounts of extra egg white (or aquafaba) and/or icing sugar to get the right consistency. Add black and orange dye for the facial features, or use sprinkles. You can also use nuts, fondant or fruits to create accessories for their heads.
Robin cookies for Christmas
(Makes 12)
For the speculoos cookie dough:
250g salted butter (or replace with vegan butter – for the best results, use vegan butter that’s close to 80% fat)
250g brown cassonade sugar (or light brown muscovado sugar)
¾tsp ground cinnamon
¼tsp ground nutmeg
?tsp ground white pepper
?tsp ground cloves
?tsp ground cardamom
Pinch of ground anise
¼tsp bicarbonate of soda
½ egg (or 2tbsp aquafaba)
350g plain flour (or gluten-free flour plus ?tsp xanthan gum) plus extra for
dusting
You can also add the finely grated zest of 2 lemons or 2 oranges to flavour
For the sugar centre:
225g caster or granulated sugar
150g liquid glucose
50ml water
Orange gel food dye
For the royal icing:
40g egg white (substitute with aquafaba for a vegan version)
225g icing sugar
Plus extra egg white (or aquafaba) and icing sugar to adjust and get the right consistency
Plus:
Black and orange gel
Food dyes
Sprinkles of your choice
Method:
1. For the cookie dough: line a baking sheet that you can fit in the fridge with baking paper and set aside for now. Cream the butter and cassonade sugar in a stand mixer fitted with a balloon whisk attachment until the butter and sugar is soft, fluffy and paler in colour. Scrape the sides and base of the bowl occasionally.
2. Add all the spices, bicarbonate of soda and egg or aquafaba, then mix for a few more seconds until completely combined.
3. Remove the bowl from the stand mixer and add all the flour. Use your hands to rub the butter and sugar mixture into the flour, then combine into a ball.
4. Roll out the dough on a lightly floured work surface, then use cutters to stamp out circles, about 7.5cm in diameter, and transfer to the prepared baking sheet. On half the cookies, stamp out a smaller circle, about 4cm from the lower third area (refer to the photo for guidance).
5. Bake for about 15 minutes, or until the edges are just starting to colour. Transfer to a wire rack and leave to cool.
6. When the cookies are cool, make the sugar glass for the centre. Add the caster sugar, liquid glucose and water to a small saucepan and stir to combine. Add a drop of orange gel food dye to colour. Heat over a high heat, but don’t stir at all until the mixture reaches 150°C. Remove the pan from the heat and use a large spoon to spoon the sugar syrup into the centre of the cookies. Immediately scatter over sprinkles. Leave the sugar syrup for 20 minutes, or until completely hardened, then peel off the baking paper.
7. Next, make the royal icing. Use a stand mixer (or handheld electric whisk) fitted with a balloon whisk attachment to combine the egg white/aquafaba and icing sugar until you get a smooth consistency. Then add tiny amounts of extra egg white (or aquafaba) and/or icing sugar to get the right consistency. Spoon one-third of the mixture into a piping bag, then divide the remaining icing between two bowls. Stir black food dye into one bowl and orange food dye into the other to colour.
Transfer each colour to a piping bag and cut a small opening on each. Use to pipe a robin design (refer to the photo for guidance). The wings are an optional extra decoration. You can make them by letting the leftover sugar syrup (used for the centres) cool, then pulling it into a long wide ribbon using your hands and cutting it into pieces with scissors. Just be careful not to do this when the sugar is too hot! It needs to be cooled to the point where it can be stretched and is malleable. It’s not a problem if this doesn’t work for you, as the robins still look good without the wings!


